How To Replace The Rv Trim

One of the easiest ways to spruce up your rv renovations is to remodel your rv trim in your camper home! It’s the perfect way to open up your camper, especially if you have dark-colored trims!

Some people like to just prime and paint over their rv trim, but for me, our rv trim was looking a little dingy over time and the contact paper on it was not doing any justice!

So, I decided to take it to the next step and DIY our own rv trim!

Now, I want people to keep in mind the many ways you can go about this, because depending on what kind of look you are going for your rv home, the type of wood and color WILL matter and will look very different depending on what you are combining together.

Therefore, let’s get into how to replace the rv trim!

Pick out your desired wood choice

Everyone is going to have different preferences when it comes to what type of wood choice, they want to use for their rv trim.

Some people like pine because it’s budget-friendly or poplar to go for a more soften colored look when they stain it.

For us, we personally went with cedar and here’s why:

-cedar wood is moisture resistant which can help prevent rot, mold, and mildew compared to other wood types.

-it’s also insect resistance, so the natural oils on cedar wood repels insects like ants and termites, so it won’t be damaged so easily or eaten up

-it worked perfectly for the soft-luxury look we were going for in our camper

-if you get red cedar wood, it comes with this beautiful aroma that smells lovely and earthy

-and last, but not least, it’s my husband’s favorite type of wood

Of course, just because we chose cedar wood, doesn’t mean you have to do the same, since everybody’s budget and aesthetic will vary!

Cut and sand down your desired wood choice

If you don’t have the tools to cut your wood down yourself, I know places like Lowe’s will do it for you if you buy your wood from there!

You’ll want to make sure you have some kind of sander, because wood is not always going to come in all pretty and spot-free! It’s probably going to have some dents and marks on it, so a good sander will get rid of those!

You can either get an electric sander or a hand sander, whichever works for you and your budget!

I would start with a course sanding strip first and then work your way up to a finer grit, since this will make the sanding process faster!

If you can, whether you are cutting your wood pieces yourself or having someone else do it, ask to keep the spare pieces of extra wood because they will be great to have during the stain process!

You can test out what different stains look like on your desired wood choice!

Pre-condition your wood (very important)

Now here’s the deal:

Before you really start to get into the staining process, you’ll want to apply pre-stain before you get into the actual staining process.

Why is this?

Because without a pre-stain, your stain will go on very blotchy and trust me, I’ve tested my stain without the pre-stain and it didn’t look great at all!

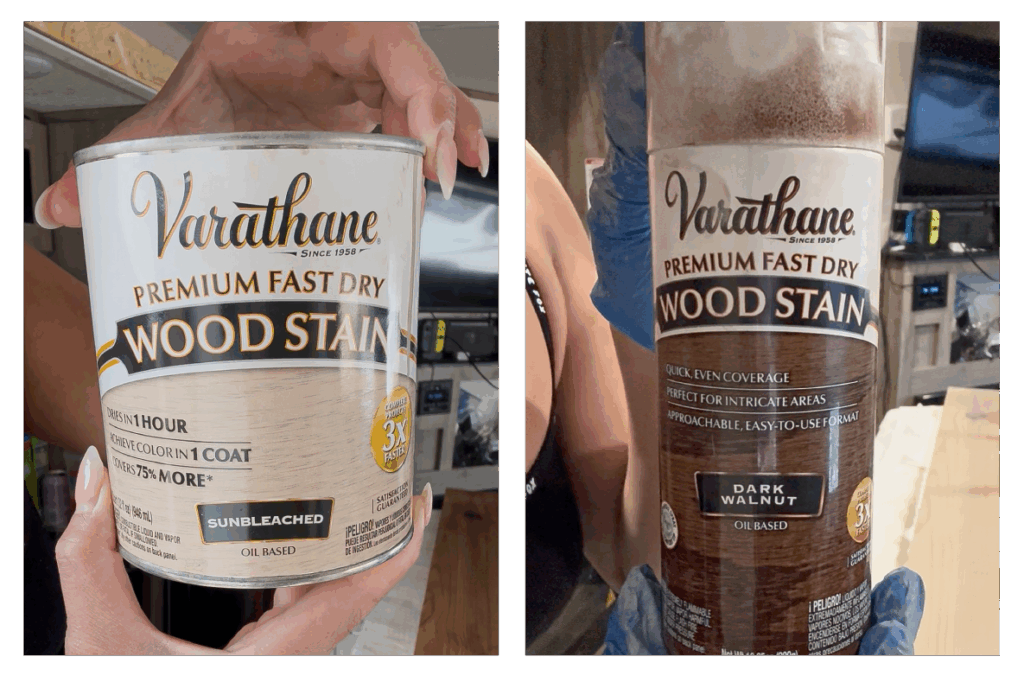
Your pre-stain will depend on whether you are using an oil-based stain or a water-based stain.

Here’s the difference between using an oil-based stain and a water-based stain:

Oil-based stains have a stronger odor and longer drying time. Cleaning up can be a pain because it requires mineral spirits instead of soap and water like a water-based stain. Sometimes they can amber or turn yellow over time under a clear coat, so if you are using whites or champagne tones, it can look more warmer than usual.

Oil-based stains can also bring out the depth and richness of the grain of the wood, so if you really love that look, then an oil-based stain will work well for your preference!

Water-based stains have low-odor and dry very quickly, which means you will have to work pretty quickly. It’s easy to clean up since you just need to use soap and water and it’s less likely to yellow over time.

Water-based stains have less “depth” to the grain and sometimes, applying a water-based stain can raise the grain slightly, but if that’s not a problem to you, you may like the water-based stain better!

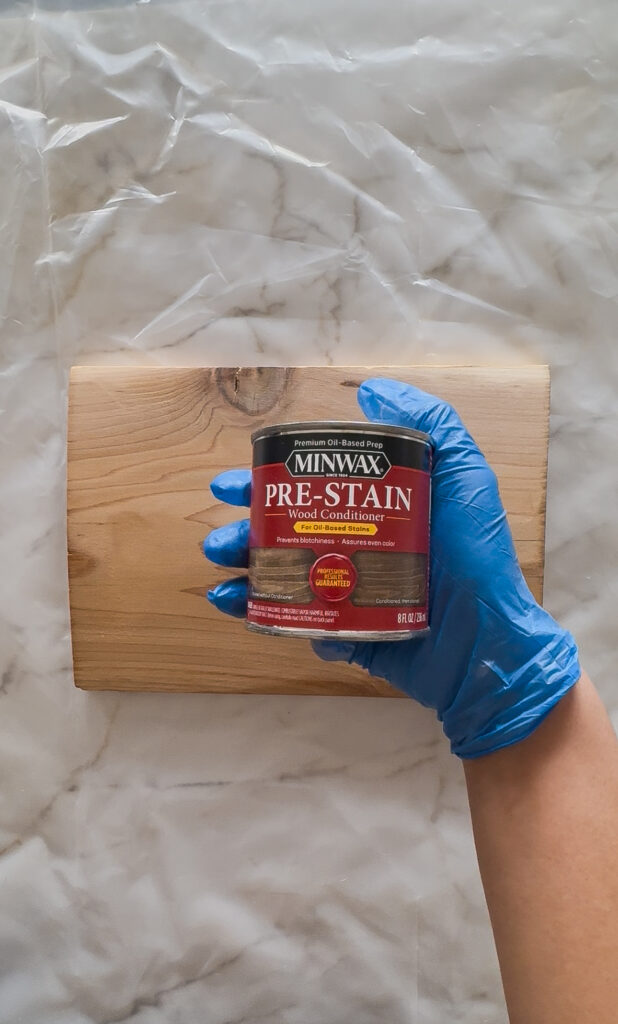
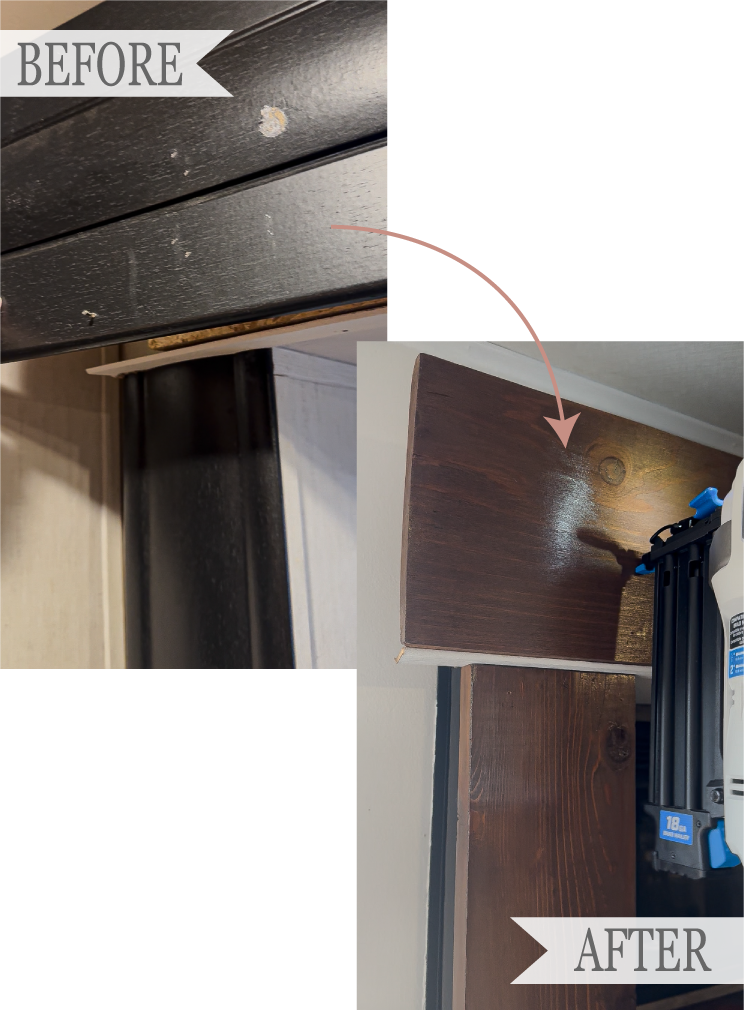
For my personal preference and look of the camper, I used an oil-based stain, which means my pre-stain was also oil-based as well!

I used the Minwax pre-stain wood conditioner for oil-based stains and it did a lovely job of evening out my actual stain!

You just need to apply a thin coat with either a staining rag or, people will sometimes do it with a brush, and let it dry for ten minutes.

After ten minutes, wipe away any access.

I would also just make sure to open up a window when applying, so that I didn’t have to smell the strong odors in our camper!

Stain your wood with your stain choice

NOW, we can get into the stain process!

This process will differ from person to person, but you’ll want to have some kind of reference and some research on how to get your desired color on your desired wood choice.

Trust me, I was on ChatGBT for a while before I found the right combination of stain, which is why it’s important to have some spare wood pieces to see how different types of stains will look on your board!

If your curious about what I used for ours, I used the Varathane wood stain in the color Sunbleached in order to make a light base for my cedar wood, especially since cedar wood can sometimes naturally come with an orange-yellow hue to it.

So, working with a whiter base help neutralize the color on cedar wood!

I do want to mention that, since this is a quick dry based, you’ll want to work QUICKLY and apply a very thin layer firsthand. Otherwise, if you put it on too heavy, it can actually absorb more of your main-colored stain and then it’d be too late to fix it.

ALWAYS apply very thin amounts and stretch it as far as you can on your wood board, so that IF you ever feel the need to apply more, then you can do so!

Once about an hour or so passed, I used the Varathane spray wood stain in Walnut to help me achieve a soft luxury look that I was going based off of my reference photo!

I did the spray to be safe since this is a fast dry stain, I worked quickly and in small increments.

Seal your stain with a clear coat

After your stain has completely dried and you’re happy with the finishing results, it’s time to seal your stain with a clear coat and make the color LAST.

I won’t tell you what kind of clear coat to get, because there’s such a wide variety out there from semi-gloss, gloss, satin, and so on.

However, I would make sure to get a clear coat that is for YOUR type of stain, whether you are using a water-based stain or an oil-based stain.

I can’t quite remember what brand I used back then, but I know I personally used a satin clear coat because I didn’t want a clear coat that let out too much shine to it.

There are also sprays or cans of clear coat, so you can do either method of painting your clear coat onto your trim board!

Again, I would do your research to find which clear coat you want to put on your rv trim!

I’m a digital nomad who lives the RV lifestyle full-time with my husband! I give advice on the nomadic lifestyle and take you along on my adventures!

Search

Leave a Reply

Your email address will not be published. Required fields are marked *